I have just started to look into comet processing. I used the the TL dataset with normal LRGB processing but without SCNR and the result was ok. So you can get decent results with normal processing too.
If you want to use CometAlignment process you need X and Y coordinates for the first and last image regardless of the filter. To me CometAlignment and StarAlignment looks pretty similar so they work with all light images.
I try to get CometAlignment into AutoIntegrate but I am still missing a few steps.
Pushed a Comet alignment to the GitHub test branch. It works at least with a small test data.
Other changes:
Added buttons to preview first and last comet images to get X,Y coordinates.
Added option Reset on setup load top reset parameters to default values before load a setup Json file.
Added an option Remove stars from lights to remove stars from a light images. Starts are removed just after star alignment is done. Note that starless images may cause problems with ImageIntegration and BlurXTerminator PSF calculations. Option Image integration use ssweight helps with ImageIntegration and manual PSF helps with BlurXTerminator.
Tooltip from comment alignment:
CometAlignment settings can be used to set values for the comet alignment process. Below are the steps to use AutoIntegrate comet alignment:
Check Comet align in Image processing parameters.
First and last image are selected automatically based on image timestamps from the DATE-OBS keyword when images are loaded.
To get the coordinates click the Preview button for the image, go to preview image, zoomto 1:1 view and click the comet nucleus with the left mouse button.
Copy coordinates from the preview coordinates box and paste them to the comet coordinates box.
It may be beneficial to run comet alignment on starless images. In that case option Remove stars from lights can be used.
Use the Run button to process images.
CometAlignment will automatically skip star alignment and SCNR. Star alignment may invalidate coordinates given here so it is not used.
Usually it is useful to run a normal image processing workflow first. This results in properly aligned stars that can be later used in the final image. A different Window prefix can be used to separate star and comet aligned images.
Note that using starless images may cause problems for example with ImageIntegration or BlurXTerminator. With missing PSF error on ImageIntegration you can use an option ImageIntegration use ssweight.BXT_no_PSF_tip
It is possible to manually run the CometAlignment process. Below are the steps to use AutoIntegrate with manual comet alignment:
Run a normal image processing.
Manually run the CometAlignment on registered *_r.xisf files. This will create *_ca.xisf files.
Optionally remove stars from *_ca.xisf files. StarXTerminator has a batch mode that makes this easier.
Load comet aligned files into AutoIntegrate as lights files.
Run AutoIntegrate with Start from ImageIntegration option.
Lots of great changes.
I have spent a lot of time on the comet processing running many scenarios.
I got stuck early on with the stars image because I was getting a very color-saturated image when applying ABE.
It turned out to occur if ABE was applied to LIghts, Channels or Combined images but didn’t occur for ABE applied to Stretched images.
I was using NXT also so not sure if that impacted it.
I also played around with Local Normalazation and Background neutralisation at times.
I think that I got hte best results with ABE on stretched; Background Neutralisation and NXT.
I then used the same settings with Cosmetic Correction and Crop added and the image was not as good.
It may not have made sense to use these settings but I was just experimenting.
I tested creating the Comet image from the *_r.xisf files and it worked perfectly. The comet align functionality and first/last image selection process works well. Not sure if there is a way to automatically copy those coordinates from the preview tab to the Processing Tab (it’s only a “nice-to-have” feature…certainly not a high-priority)
Comet processing was a bit of a learning curve for me. You want enough detail and brightness to capture the Comet tail but you don’t want to brighten up the overall background too much when you add the comet image back to the stars image.I struggle with darkening the background without losing the comet tail, but I’m only a beginner so I’m sure that I will get better at this.
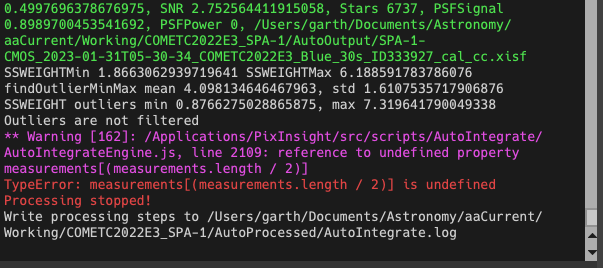
I’m currently running AutoIntegrate on the 79 image C2022E3…it’s taking a very long time which is understandable
Thanks for testing! Very useful, I have done only small data sets with comets so far.
I have very mixed results when using ABE. I cannot really say when to use it. Typically I do not use it but if the image turns out bad I try it at different phases depending on the image. Interesting if Cosmetic Correction and Crop made things worse for ABE. In all my cases so far the crop has helped with ABE. Good to know that there are even more combinations to try .
I have also wanted to do comet processing with the full set of C2022E3 but have not started as it will take a long time…
Hmm, adding buttons to copy to the first/last image directly sounds like a good idea.
I will check that copy button thing and maybe save different preview sizes for different resolutions. But then I try to stop, just stabilize the code and push out a new automatic update.
Hi Jarmo,
I noticed that you have already implemented the copy button…great work.
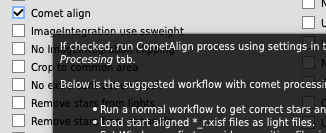
I picked up a very minor error in the ToolTip text for the Comet align checkbox.
2nd dot point in the image below “Load start aligned…” should read “star”
I ran the comet alignment for the large dataset. The process worked well except that the comet turned out very purple instead of green.
I will rerun it now from the original light frames without any ABE or other settings that may have impacted the color of the *_r.xisf files that I used for comet alignment.
The process took a long time and created about 30-40GB of files.
Congrats for the win in the Telescope Live January 2023 contest! Great image, well deserved!
I have just pushed a functionality to save a different preview size for different screen resolutions. Should help if you switch for example between laptop and external monitor.
Thanks - I actually didn’t know that I had won…I won picture of the day (today) so I was pretty happy waking up to that
I can honestly say that I couldn’t have done it without you and AutoIntegrate
I hope that more people become aware of AutoIntegrate.js
It makes things so much easier for beginners by reducing the steep learning curve for Pixinsight. It also creates a pathway to learning more about Pixinsight over time because you can optimise the quality of images by understanding how to adjust the AutoIntegrate settings.
I always metion AutoIntegrate.js in the “Processing” section, but was wondering how you would feel if I mentioned it in the description of any good quality images that I post?
Congrats on the Rho Ophiuchi image too! Great image! I really like your processing, they are not over processed but have nice color and detail. You do not get a great image from a basic workflow like AutoIntegrate, you need to do it after that.
Sorry for spoiling the surprise of the January competition, I forgot the time difference
Thanks for the mention in the image description. You can mention AutoIntegrate if you like. Or not mention it. I am ok with both.
No problem - it was already announced, I just didn’t see it.
I’m learning things every day…that’s usually the case when things are new.
A few weeks ago, I thought that the more saturated images looked better, but I’m starting to notice things that I didn’t know before - the subtleties…not too much color, good star definition. I’m really enjoying it.
There are some images that I really liked a couple of months ago that I don’t like anymore because I look for different things now. I’m sure that I will look for different things in another 3 months also. THat’s what keeps it interesting.
The new resizing option is great. There is far more flexibility to cater for a bigger preview window when it’s needed and a smaller one where it makes sense. The windows size is adjusting very well when I move it from the large screen to the smaller macbook screen…much better than before.
Hi Jarmo,
Thought I would say a quick hello.
I haven’t spent much time on astro-processing lately.
I submitted my Feb contest images recently and tested out a few things.
I always use the latest version before I do any processing in the hope of catching any bugs that may have been introduced. I haven’t encountered any problems so far and the images that are produced by AutoIntegrate are amazing.
Please let me know if there are any specific tests that you would like me to run with any new features that you introduce.
I just downloaded a couple of small CMOS observations from Telescope Live, one of Eta Carina using the AUS-2 telescope fitted with CMOS. Looking forward to seeing how it compares to the CCD camera…I love the way that the stars look with AUS-2.
I also thought of an enhancement that would be useful, although I think it may be difficult to implement. Narrowband processing allows the selection of a single palette or all All palettes. I often select All and choose the one that I like the best. The tradeoff is that it takes a long time to process all of the combinations and I only really ever look at 2 or 3 combinations (usually SHO, HSO and occasionally HOO). I was wondering if there was a way to introduce Multi-select in that dropdown box?
Good to hear that you have tried the latest version. There has been some problems but not really in the basic workflow.
New CMOS cameras look really good. I have tried with a few images.
I would also like to process just a few palette options, not just one or all. I need to look if it is possible to select multiple options. Or maybe I could add a mechanism where you can add your choices with some button before actually running them. And in general, it should be possible to do the combinations later in the processing which would make them a lot faster to generate,
For now you can make narrowband combinations a bit faster if you use AutoContinue. Then you start with integrated images.